SwiftUI + GraphQL = 😍🚀🙌
Hi there! Today I want to take some time and show everyone a little passion project of mine: combining GraphQL with SwiftUI to make rich, clean, and data-driven applications. We will be taking a look at how to use GraphQL, the tooling that I have developed to integrate GraphQL with SwiftUI and create a small prototype with reusable views and working pagination. There's a lot of ground to cover, so let's start.
Alright, Story-Time. So in 2019, I took an internship at Facebook in the AR Publishing Team. We focused on how content-creators (i.e. Instagram influencers, hard-core social media teams, etc.) could create their own AR effects and deliver them to all of Facebook's Platforms (Facebook, Messenger, Instagram). The idea was to break ground and create YouTube for AR. Kinda. In that team, we mainly worked with a web Stack. Which at Facebook means PHP and JavaScript. Client-Server communication wasn't anything new to me, but this was my first contact with GraphQL and, in particular, the JS framework Relay.
And that's when I became a GraphQL junkie. I. Mean. It. I'm a junkie. So without further ado, let me evangelize about GraphQL for a min.
Let's talk about GraphQL
As mobile devs, we usually work with REST APIs. And believe me, REST is awesome! The concept of resources that you either read (GET), update (PUT) or create (POST) is simple enough that it can be used by almost anyone. That's what's so appealing about REST. Everybody knows how to use it. And if you don't, I'm sure some blog post out there will explain it to you in less than 5 mins. But in the scope of ever-larger public APIs, REST starts showing it's downsides.
Building a Social Media App with REST

Let's imagine for a minute that we're the iOS devs that have to build the Facebook App. There's already a REST server. We just need to contact the server and layout the data. For this example, we want to write the PostView: a card that appears when the user is looking at a Post. The way this happens with REST is that when the user navigates to the Post, the App will make a GET request to fetch the information for that Post.
Consider, for instance, that we received the following JSON response from the REST server:
{
    "id" : 42,
    "author" : {
        "id" : 1337,
        "firstname" : "Frank",
        "lastname" : "Young",
        "friendsCount" : 437,
        "mutualFriends" : 22
    },
    "group" : {
        "name" : "We Love Daschunds",
        "memberCount" : 2530
    },
    "text" : "This hot doggo getting a bath",
    "media" : [
        "https://..."
    ],
    "createdAt" : "...",
    "analyticsTrackingId" : "...",
    "moneySpentOnPromotion" : 0
}
As we start building our view we can see that we could read a lot of the data that we want to display, like author.firstname, text, and media. However, there's a lot of data in the response that we don't actually need, like author.friendsCount or analyticsTrackingId. This phenomenon we have where we fetch data only to then immediately throw it away is called Over-fetching. When your user is on a mobile connection it could mean much longer load times and a bigger hit to their data usage. And as the complexity of the server grows, in practice so does the amount of data that is over-fetched.
Later, as we finish implementing our view, we notice we didn't receive any data regarding the comments or likes. But we still want to display that. So we have to make another request to receive the comments. As you might have guessed, this is called Under-fetching: where we have to trigger subsequent follow-up requests to the server to make up for the missing data in the first response. This leads to added complexity in your app, added data usage.
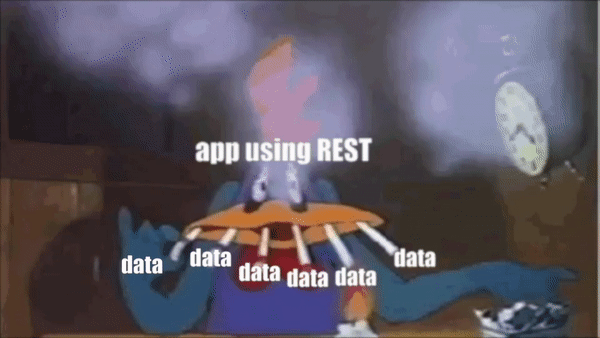
I suppose that this story sounds very familiar to a lot of mobile devs. And the problem is actually quite simple to see: the model chosen by the server developers does not match the exact model that the client developers want to display. This is the limitation of REST. It is resource-based. Therefore you always have to think in terms of resources. Your responses are supposed to contain the information of that specific resource and only that resource.
One possible solution to these problems is to use GraphQL. But what is it? GraphQL actually two different things:
- A Query Language (that's what the QL stands for...)
- A Server Runtime that can respond to those queries.
The Query Language
Much like SQL, GraphQL is a Query Language that looks like a weird combination of JSON and Swift. Since it's a query language, it makes the client specify what data it wants. This might sound like extra work for us, the client developers, but what it means in practice is that we can ask for as much or as little information as we need at the moment. The best way of understanding GraphQL is by looking at it with the PostView case from before. We can send the following request:
query {
    We even pass arguments in this Swifty mannerpost(id: 42) {
        text
        author {
            firstname
            lastname
        }
        media
    }
}
and receive as a response:
{
    "data" : {
        "text" : "This hot doggo getting a bath",
        "author" : {
            "firstname" : "Frank",
            "lastname" : "Young"
        },
        "media" : [
            "https://..."
        ]
    }
}
So what's going on here. Well, we basically write this pseudo JSON with all the values removed. And we will receive the value for every key that we list in our query. If we want more data, we just list more keys in our query:
query {
    post(id: 42) {
        text
        author {
            firstname
            lastname
        }
        Add a fieldgroup {
            name
        }
        media
    }
}
which would result in the following JSON:
{
    "data" : {
        "text" : "This hot doggo getting a bath",
        "author" : {
            "firstname" : "Frank",
            "lastname" : "Young"
        },
        Get it in the response"group" : {
            "name" : "We Love Daschunds"
        },
        "media" : [
            "https://..."
        ]
    }
}
What does the "Graph" mean?
An integral part of understanding GraphQL is that it has an object-oriented type system that can be used for communication. This means that we deal with object types (like classes) in a graph. These objects have properties and connections to other objects. In our example, a connection would be how we can go from a Post to the author. So you can consider accessing this as traversing edges in a graph. Pretty cool, right?
But the big plus point we get from this type-system is that we know the exact types of every value that could possibly be returned by the server. We know the shapes of objects, the nullability, and if the server developers included it, we even get documentation. Ok, I'm done nerding out about GraphQL, this is supposed to be a SwiftUI post, so let's talk about Relay.
What's Relay?
Relay is a set of tools, that enable using GraphQL from React. But the main selling point of the combination of Relay + React is that the declarative nature of GraphQL and React work together seamlessly. With Relay, we benefit from the type-safety that GraphQL gives us + for most apps it removes the need for state management patterns like MVC, MVVM, or Redux.
The idea is that UI components can declare their Queries (or Fragments) from GraphQL inline. No state management required. This is the kind of tool that you can only really see the benefit of when you're using it, so if you're interested, please do give it a try. My point is that I tried Relay while at Facebook, and an idea just popped into my head. If SwiftUI is kinda like the React for Swift, could we build Relay for SwiftUI?
Relay for SwiftUI?
So that's what I sought out to build. And I call it Graphaello. It's an open source tool that will let you use GraphQL from within your SwiftUI code. Just like Relay!
How does it work? Well, it's kind of like a weird overengineered pre-processor that reads your SwiftUI code and generates everything you need from there. But that's not the important part, because my main concern with Graphaello was the development flow and experience. So how about we explore Graphaello together with an example?
Building a Movies App using Graphaello
In this example, we will be creating a simple App to browse popular movies. We will be covering how to:
- Set up Graphaello with an Xcode Project
- Perform queries
- Create reusable views using fragments
- Use connection-based pagination
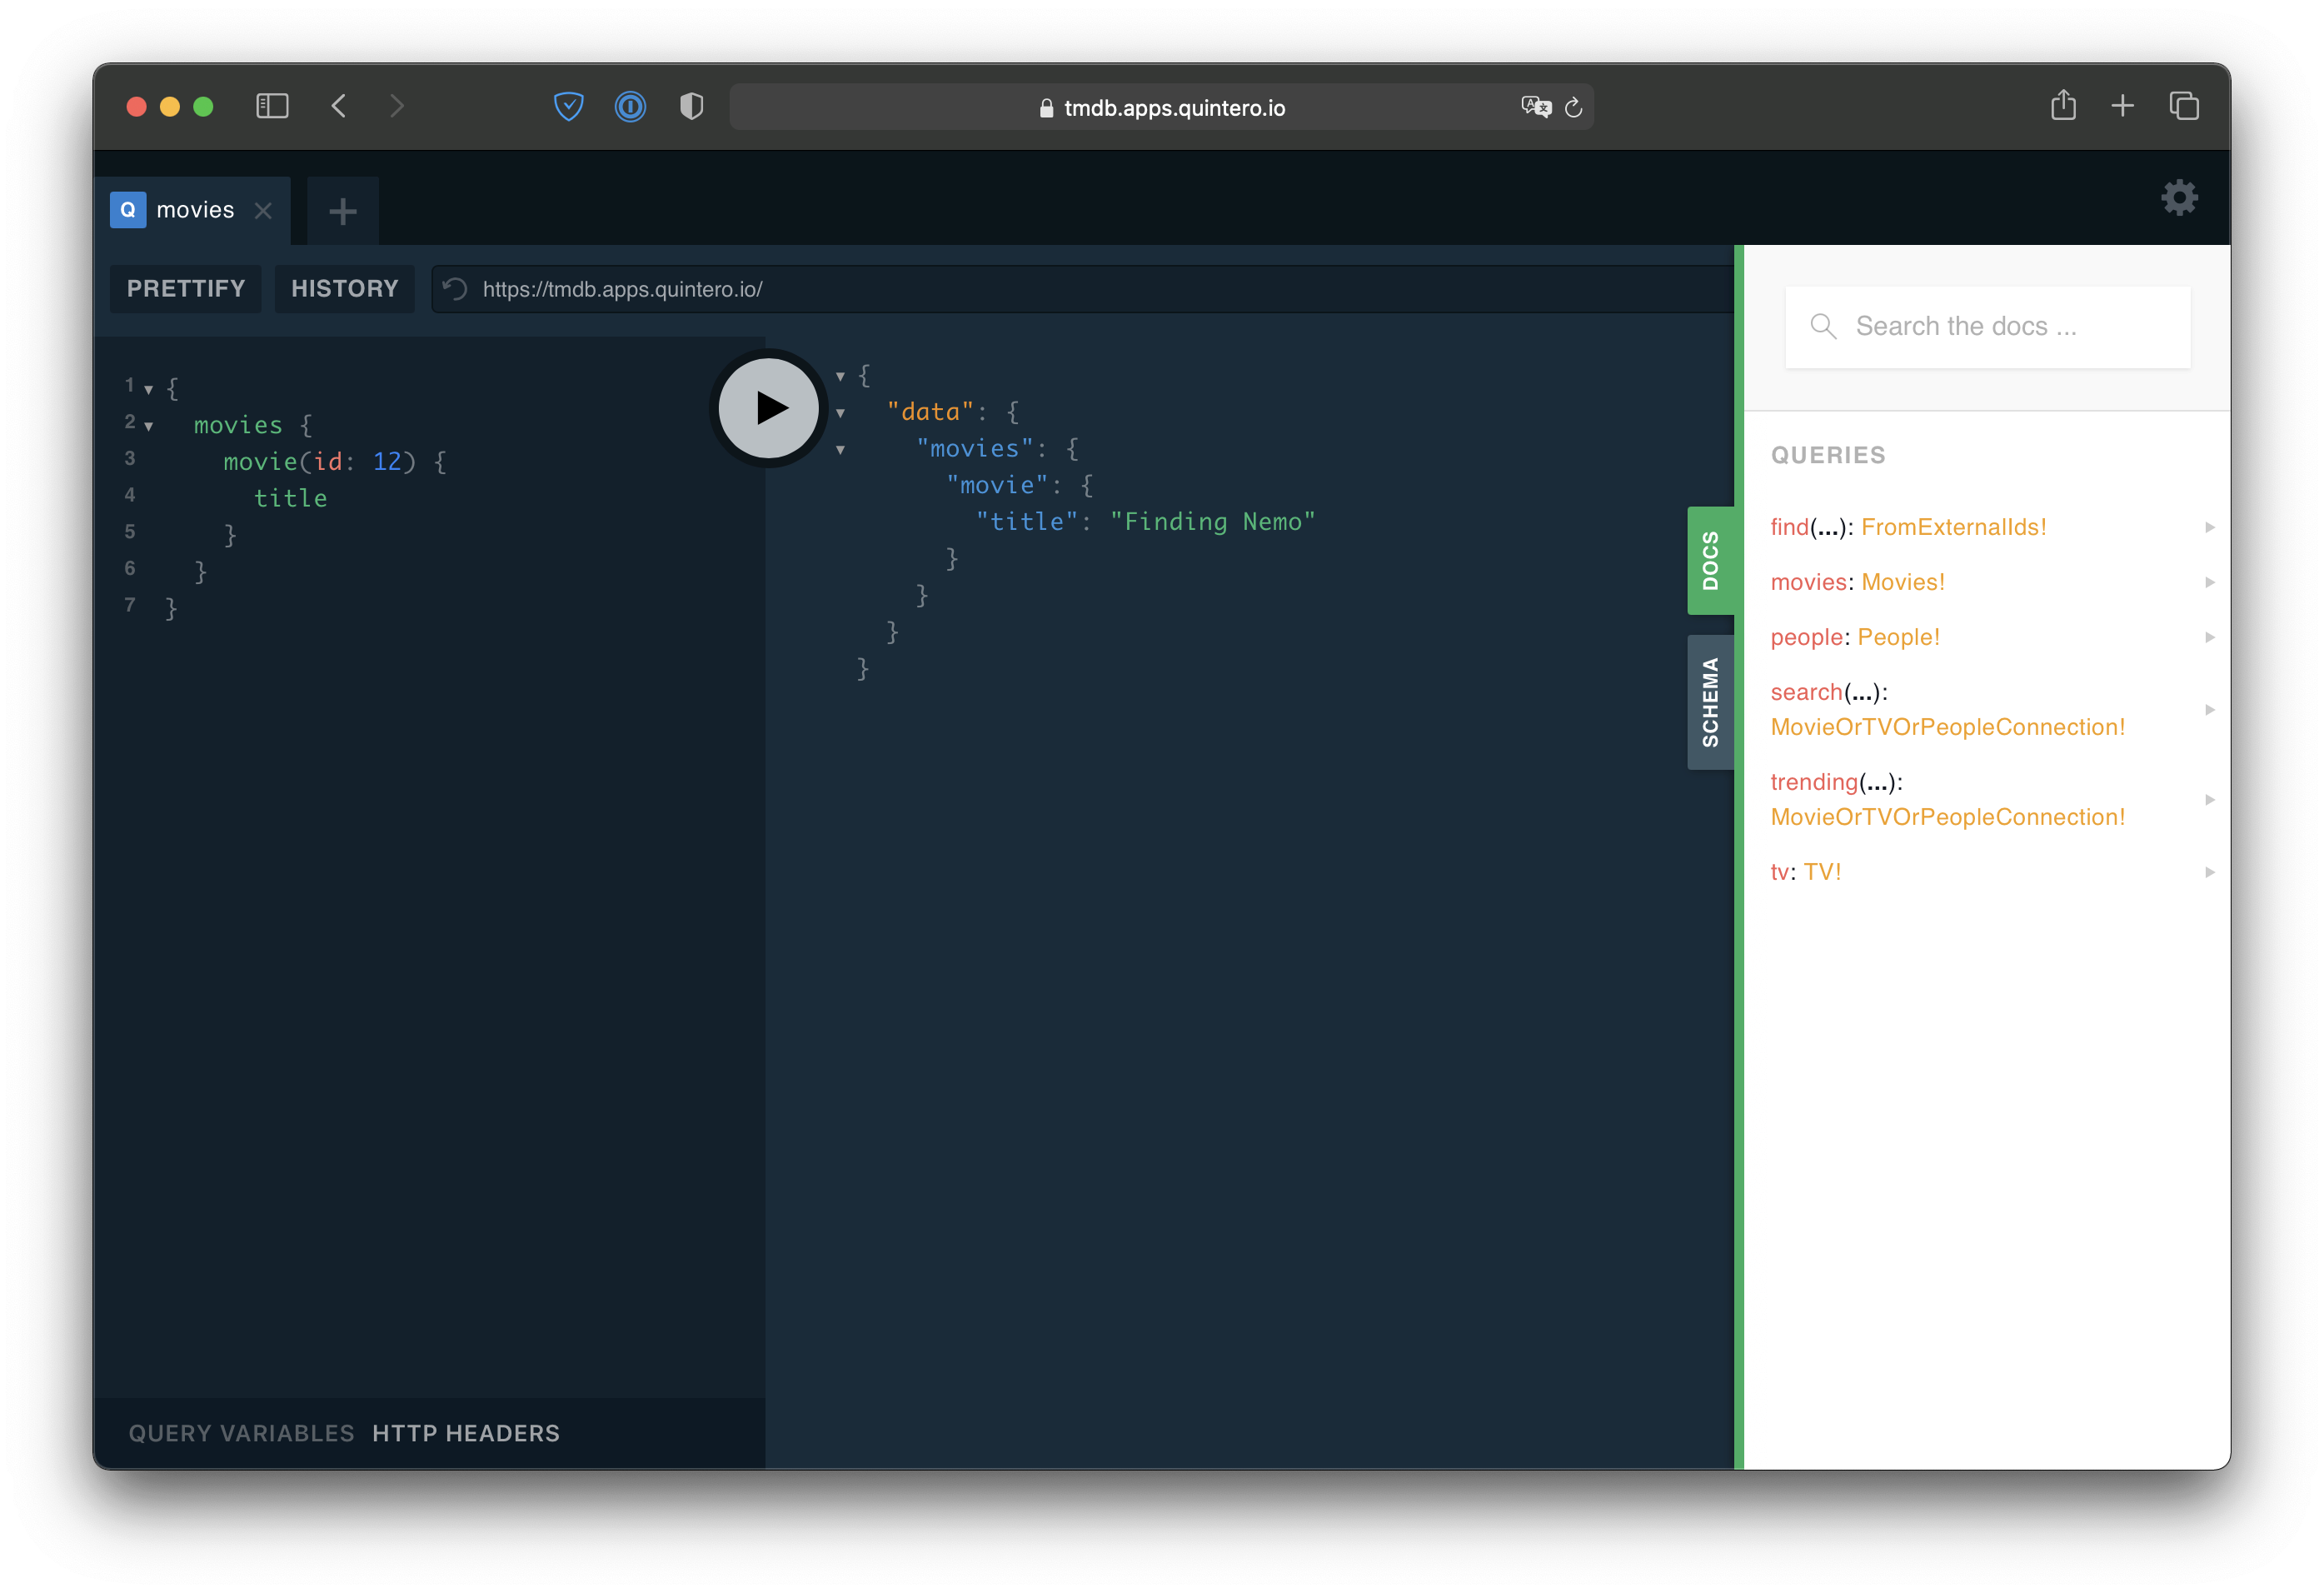
For this example, we will be using a GraphQL Wrapper for The Movie Database that I have provided publicly over here. We can ask this API for information regarding movies. For example, we could ask for info on the movie with the ID MDoxMg== like this:
query {
    movies {
        movie(id: "MDoxMg==") {
            title
        }
    }
}
which will return:
{
  "data": {
    "movies": {
      "movie": {
        "title" : "Finding Nemo"
      }
    }
  }
}
If you open the API in a browser you'll see a live Web IDE called GraphQL Playground. It allows us to experiment with GraphQL, run queries, and view the documentation. Please, feel free to check it out, and try a couple of queries while you're there.
Note: In the interest of time, I will not be explaining the concepts of SwiftUI. If you're looking for some introductory reading to SwiftUI I'm happy to recommend Paul Hudson's articles on SwiftUI.
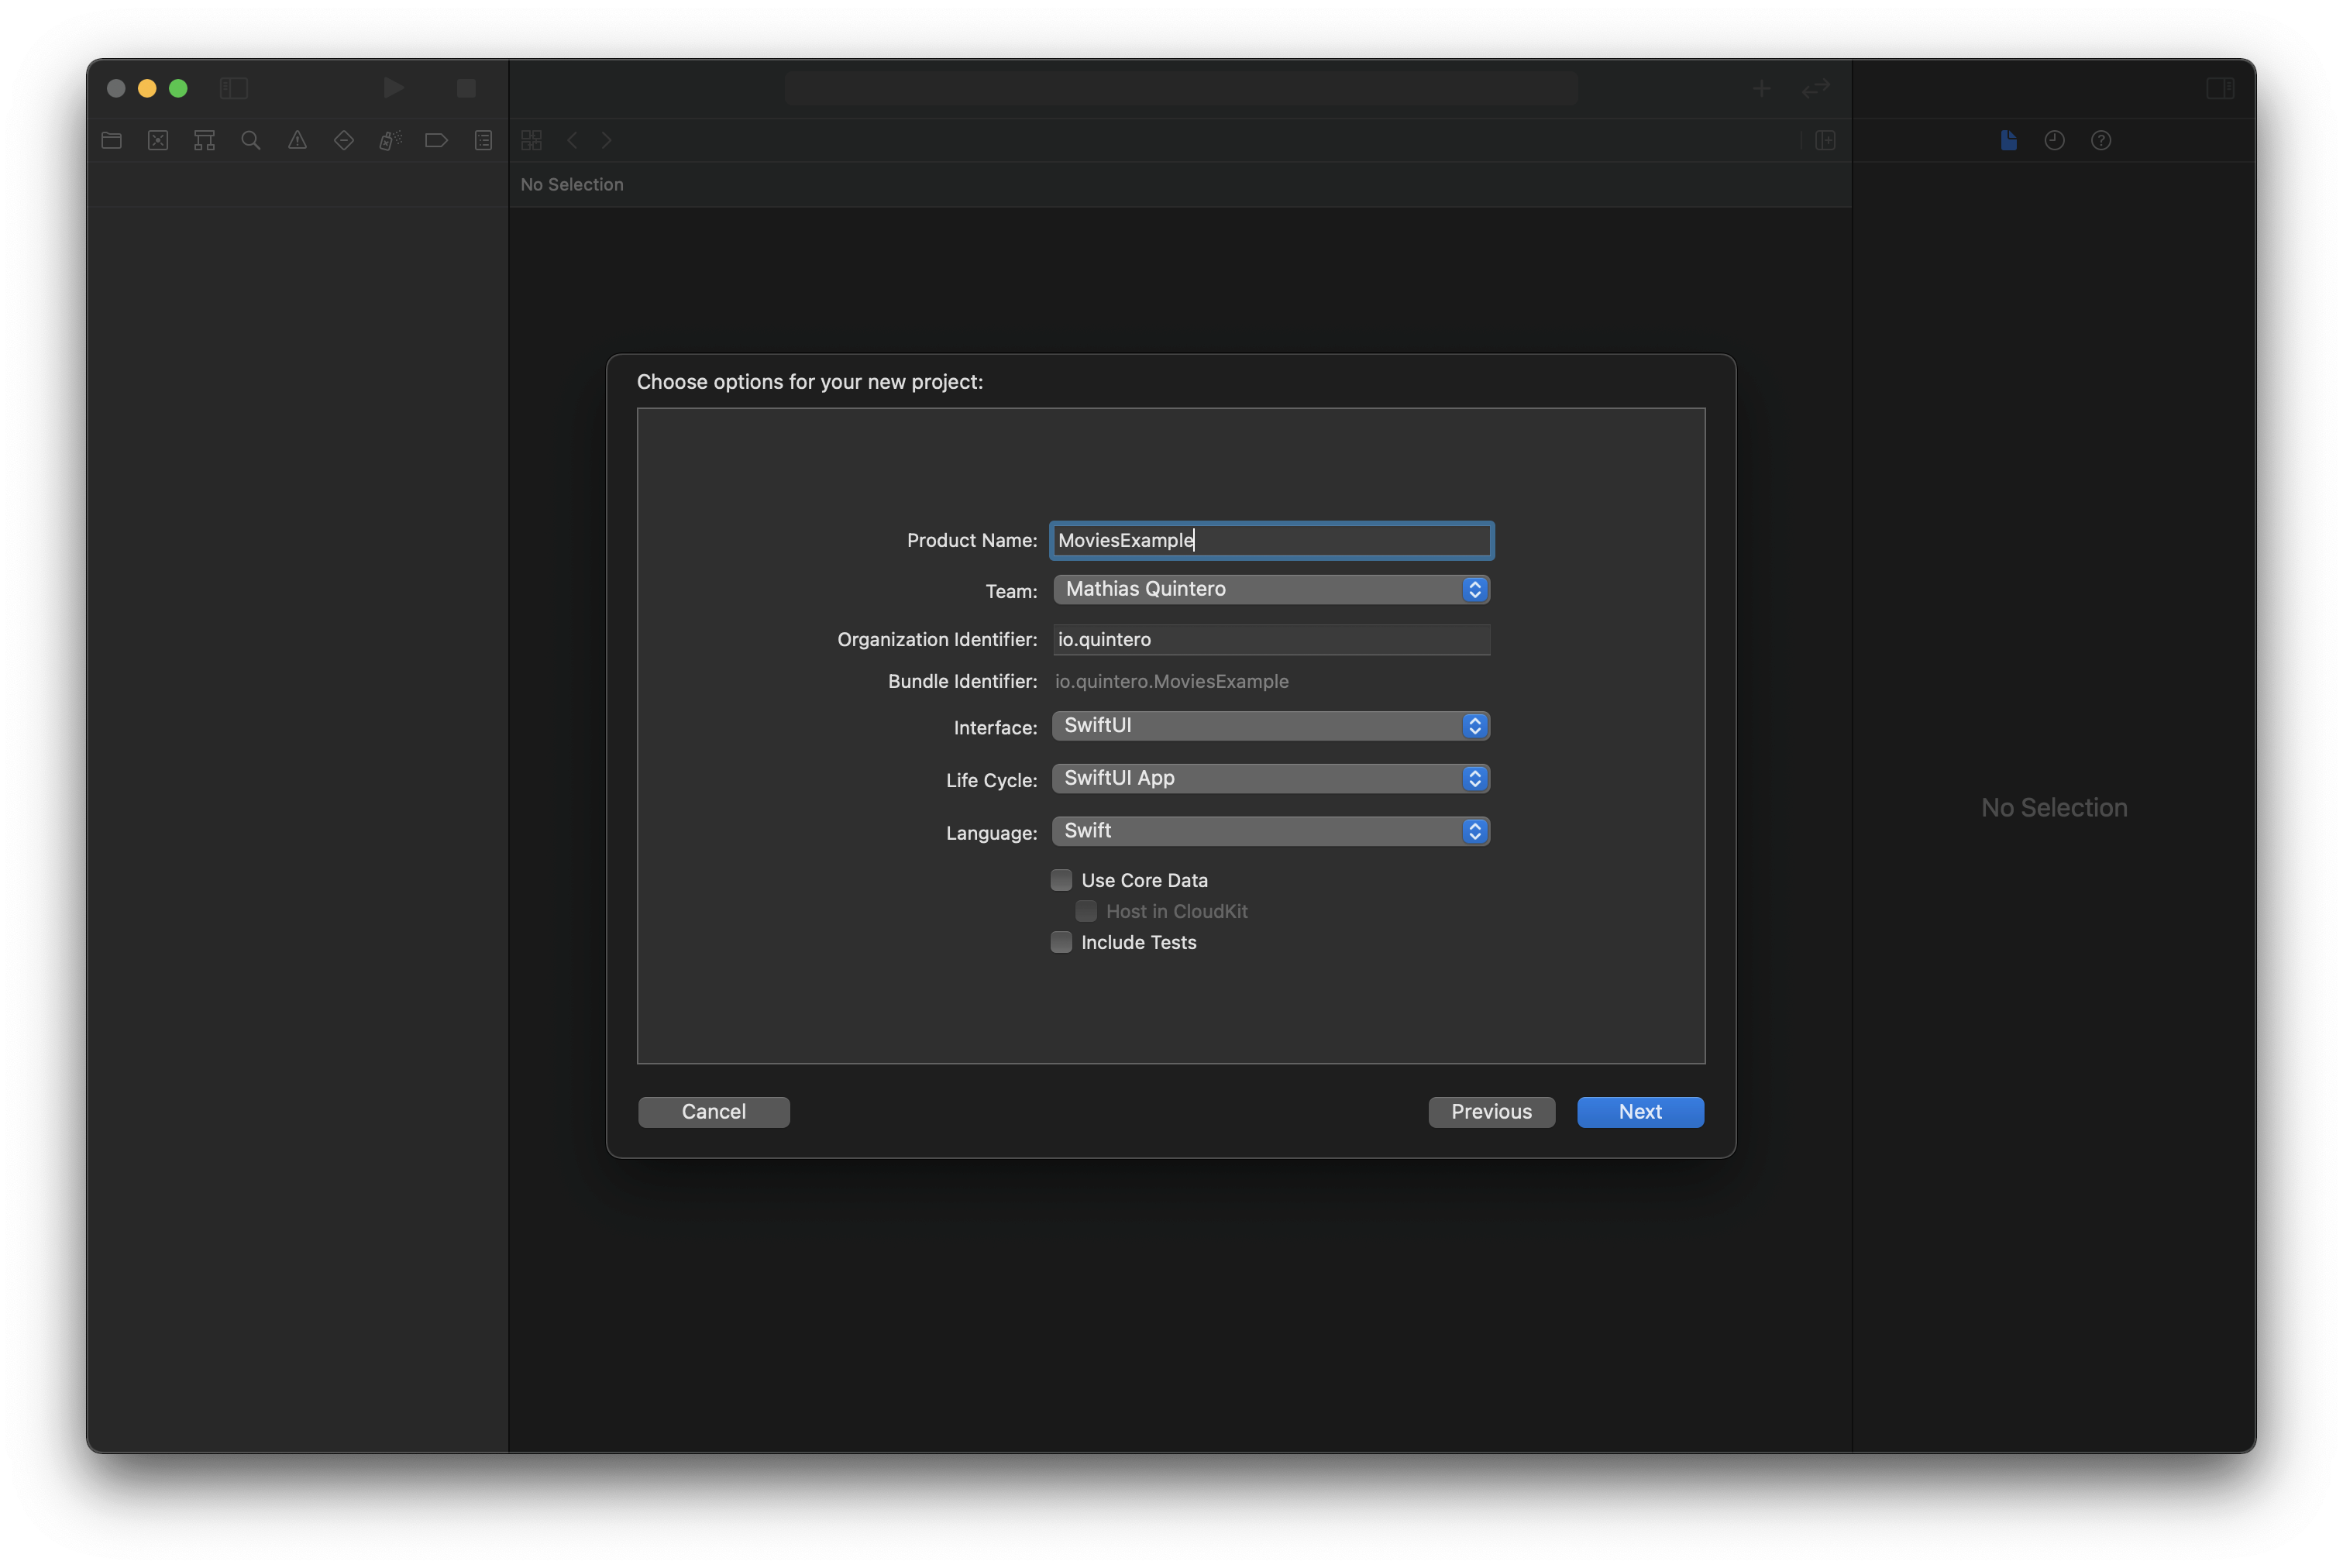
Set Up Graphaello
To set up a project with Graphaello we first need an Xcode project project. This time, let's create a SwiftUI iOS project. Open Xcode and click File > New > Project. Create an iOS Application and make sure you choose SwiftUI. I also recommend the SwiftUI App Life Cycle.
Now we need to install Graphaello on our machine. The easiest way to install it is by using homebrew. So if you have homebrew already installed you can run the following on your terminal:
brew tap nerdsupremacist/tap
brew install graphaello
Now that you have Graphaello installed on your machine, we can continue by integrating it into our App. Please close Xcode completely and in a terminal navigate to the folder containing your project and run:
graphaello init
This command is setting the project up so that Graphaello can work properly. Now we need to tell it which GraphQL API we want to use. So in the same terminal also run:
graphaello add --apiName TMDB https://tmdb.apps.quintero.io
This command registered our API with the name TMDB. That's it, Graphaello is set up. You may now close the terminal. You can now open your project in Xcode. The rest of this tutorial will take place there.
Query some Data
Before we write our actual app, let's make sure this works. So let's write a View that will tell us the name of a Movie. We start by writing the UI:
struct Test: View {
    var title: String

    var body: some View {
        Text(title)
    }
}
And to fetch data from GraphQL we simply have to tell it where to get title from. For that, we use the @GraphQL property wrapper:
struct Test: View {
    This tells Graphaello how to load title@GraphQL(TMDB.movies.movie.title)
    var title: String

    var body: some View {
        Text(title)
    }
}
What is happening here? Let's break that down:
@GraphQL: signals to Graphaello that this property should be filled from GraphQLTMDBtells Graphaello that it should fetch this value from the TMDB API we added earliermovies.movie.titleis the path starting from the Query that it should follow.
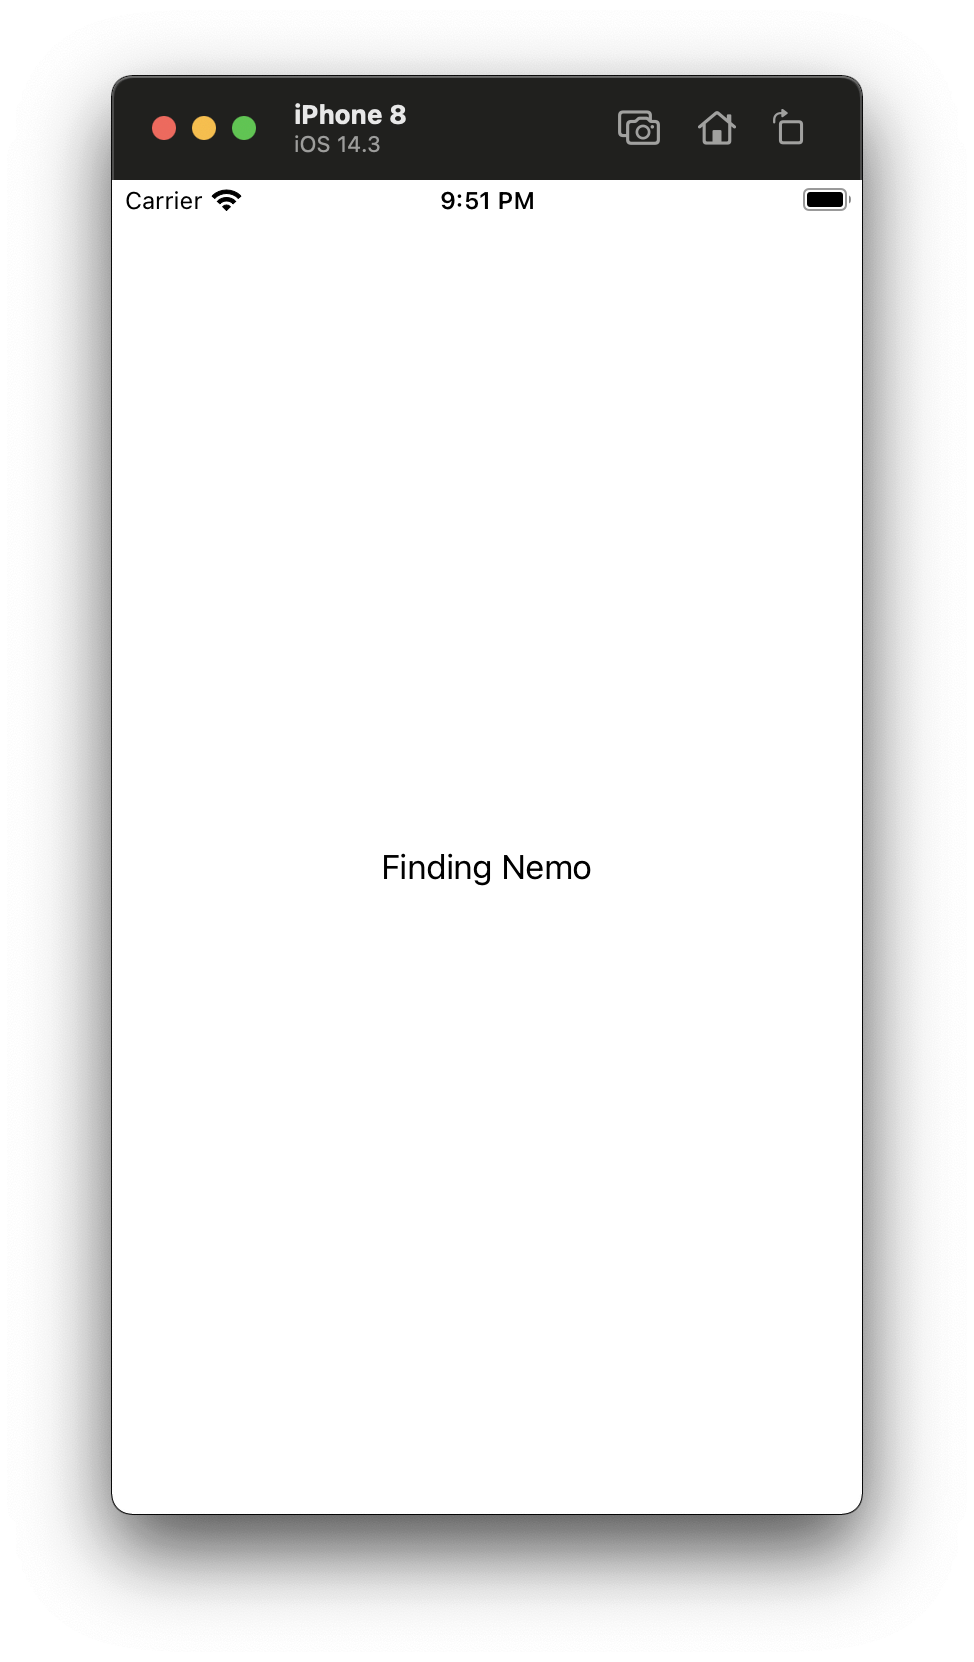
Now it's time to use this view. Make sure that your project builds (⌘ + B). To render our view, we first need an instance of the TMDB client in our App. Some testing will show us that TMDB now has a function called test that returns a View. And it expects a parameter named id. Interesting, right? Let's give it a try. As for id let's use MDoxMg== for now and see what happens:
@main
struct MoviesExampleApp: App {
    Add an instance of the clientlet api = TMDB()

    var body: some Scene {
        WindowGroup {
            The type TMDB now has a test methodapi.test(id: "MDoxMg==")
        }
    }
}
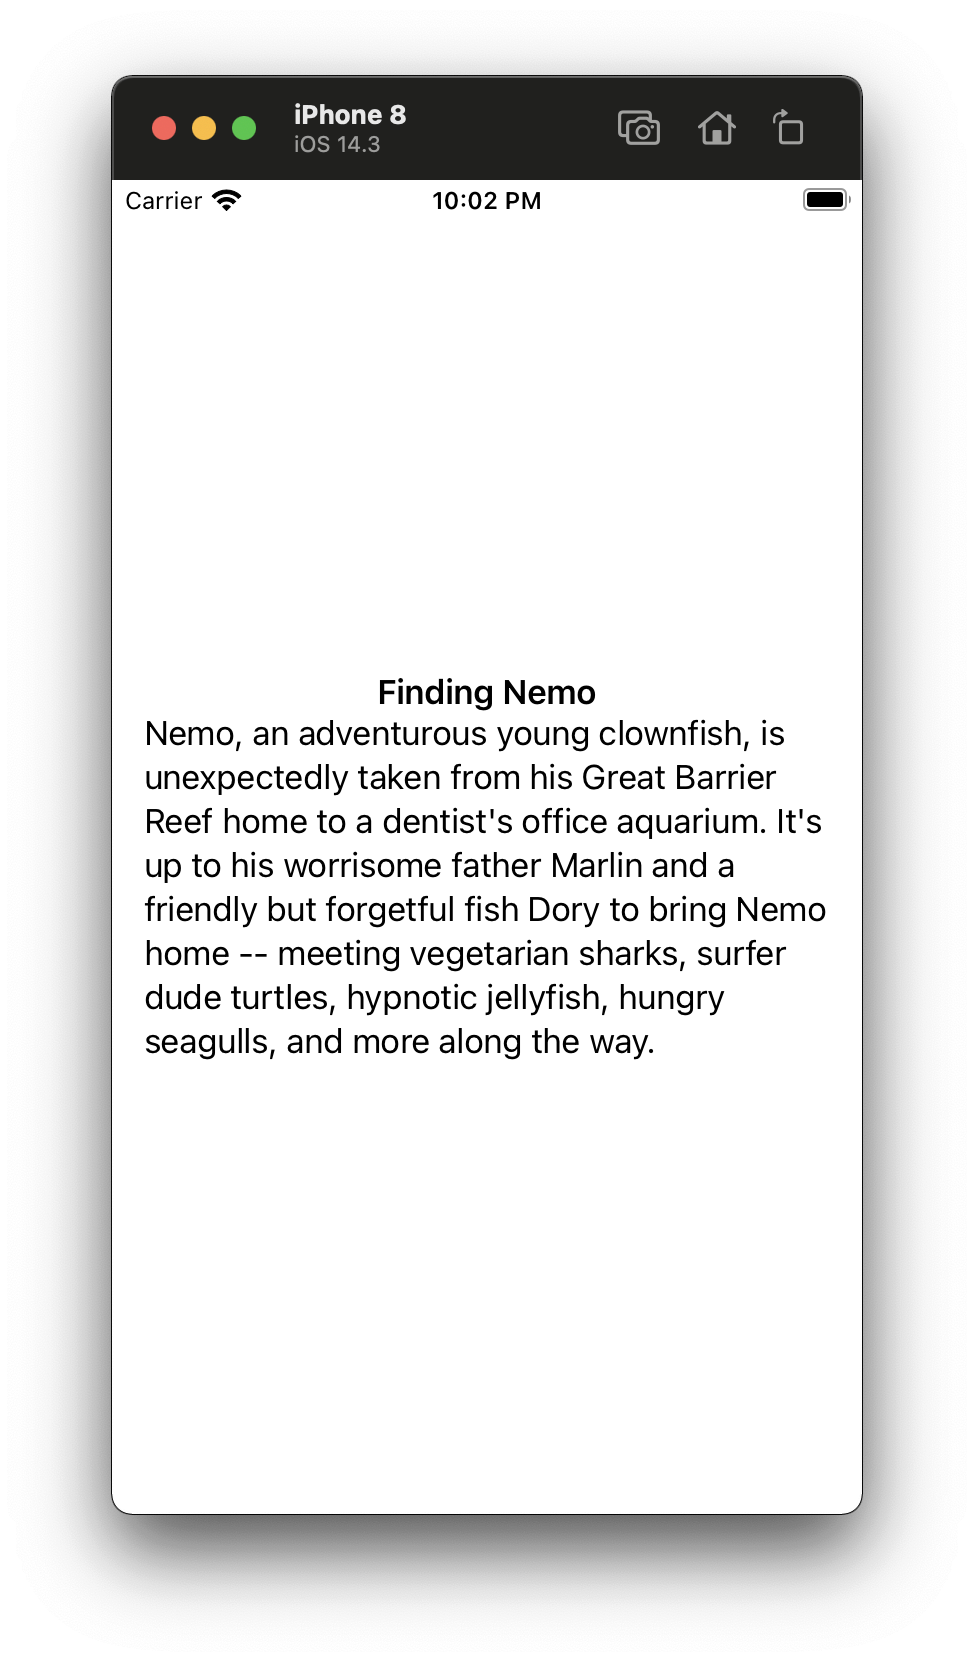
If you run the project now, you should see this:
So what happened there? Graphaello saw our Test struct that was using the GraphQL property wrapper. It type-checked the value of title, created a GraphQL query for our View, and added a function to TMDB that can display it. All of it is taken care of. If we wanted to query more data we simply add more properties, like for example the overview:
struct Test: View {
    @GraphQL(TMDB.movies.movie.title)
    var title: String

    Just like that, you're fetching more data@GraphQL(TMDB.movies.movie.overview)
    var overview // Swift can infer the type ;)

    var body: some View {
        VStack {
            Text(title).bold()
            Text(overview)
        }
        .padding()
    }
}
If you run the app again, you'll see the extra information delivered:
That's pretty neat, right? So far, we have basically only written UI code. Since GraphQL is a declarative language it fits right into the properties of our views. Easy! Let's take it up a notch.
Reusing Views
Sometimes we want to build views that we can reuse across our App. To create a reusable View, instead of specifying the path starting from the query, we start with the GraphQL type with the information we want to use. For example, we could create a MovieCell that displays the data from a Movie. So naturally, we will use the Movie Type:
struct MovieCell: View {
    @GraphQL(TMDB.We start by specifying the type the data belongs toMovie.title)
    var title

    @GraphQL(TMDB.We start by specifying the type the data belongs toMovie.overview)
    var overview

    var body: some View {
        VStack {
            Text(title).bold()
            Text(overview).lineLimit(3)
        }
    }
}
Let's say we want to display two movies side by side (i.e.: my favorite movies Star Wars and Finding Nemo). Well, we can ask for both using a query. This time, however, instead of writing down every field we want to fetch, we tell Graphaello to give us the information we need to render MovieCell. We can do this by asking for the movie like before, but without a field, and as a type we will use MovieCell.Movie (a.k.a. the Movie that MovieCell needs).
struct Test: View {
    @GraphQL(TMDB.movies.movie(id: .value("MDoxMQ==")))
    var starWars: Ask for the Movie needed by the cellMovieCell.Movie

    @GraphQL(TMDB.movies.movie(We can hardcode parameters tooid: .value("MDoxMg==")))
    var findingNemo: MovieCell.Movie

    var body: some View {
        HStack(spacing: 32) {
            Render MovieCell with the MovieMovieCell(movie: starWars)

            MovieCell(movie: findingNemo)
        }
        .padding()
    }
}

@main
struct MoviesExampleApp: App {
    let api = TMDB()

    var body: some Scene {
        WindowGroup {
            We no longer need to pass an idapi.test()
        }
    }
}
The code above will render the following:
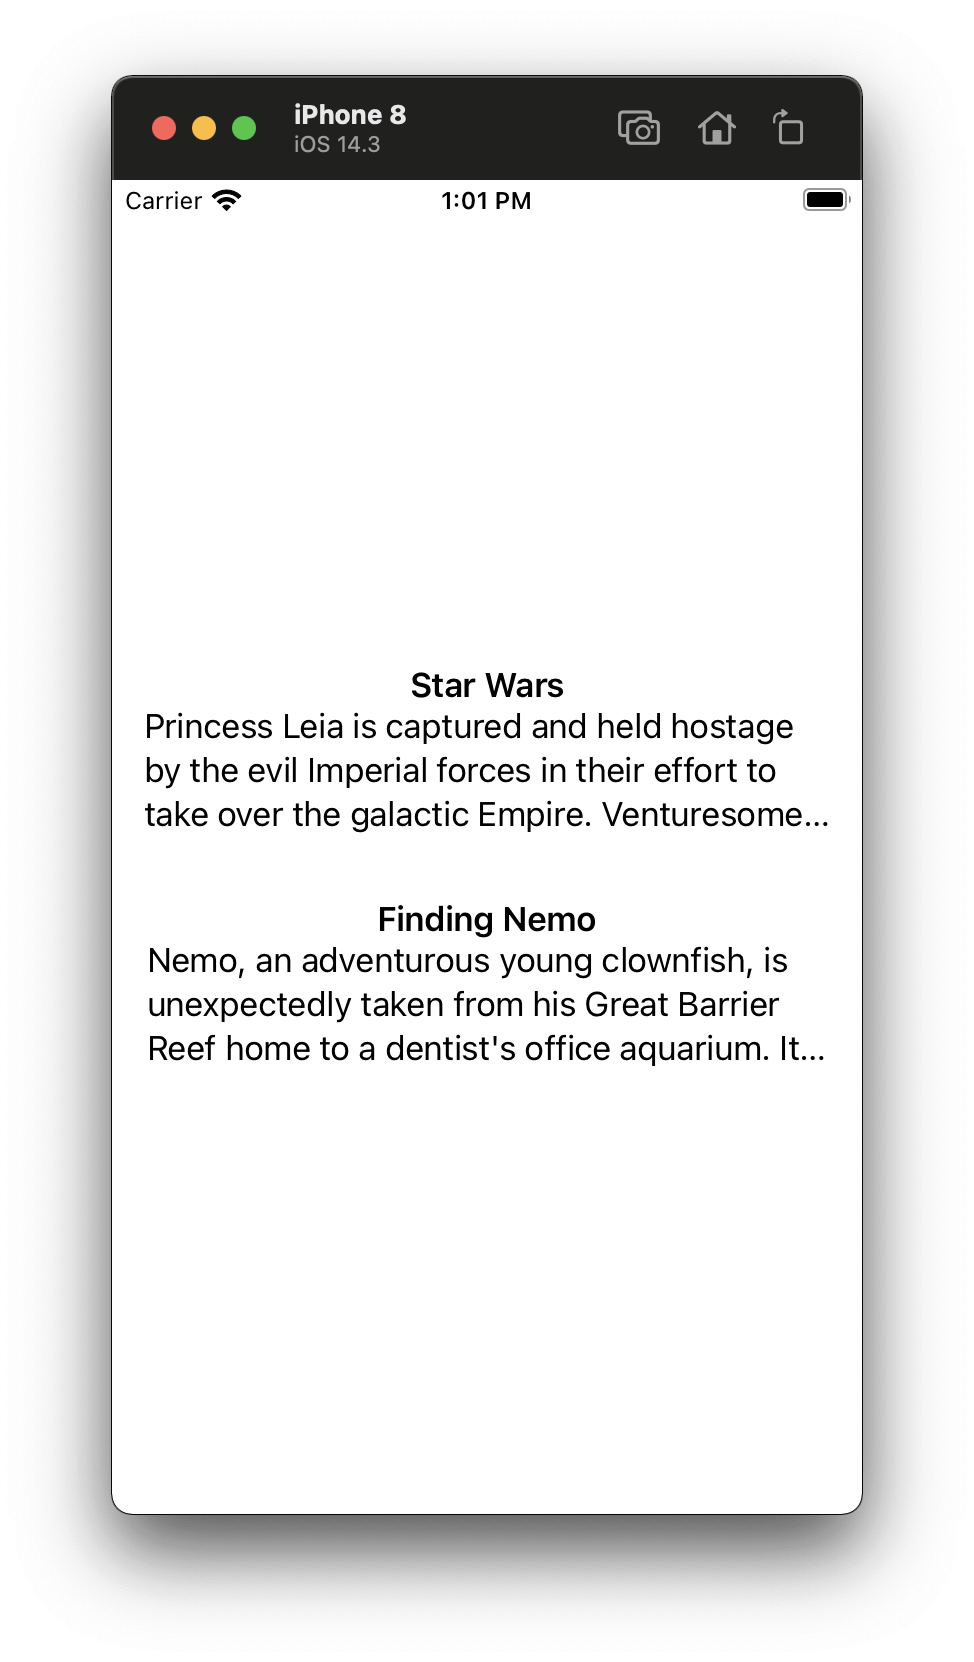
This reusability of MovieCell means that MovieCell can change the data it's displaying, and the changes are propagated to all the parents. Our Test View doesn't care about the specifics of what MovieCell needs. It just cares that it needs a movie.
Pagination
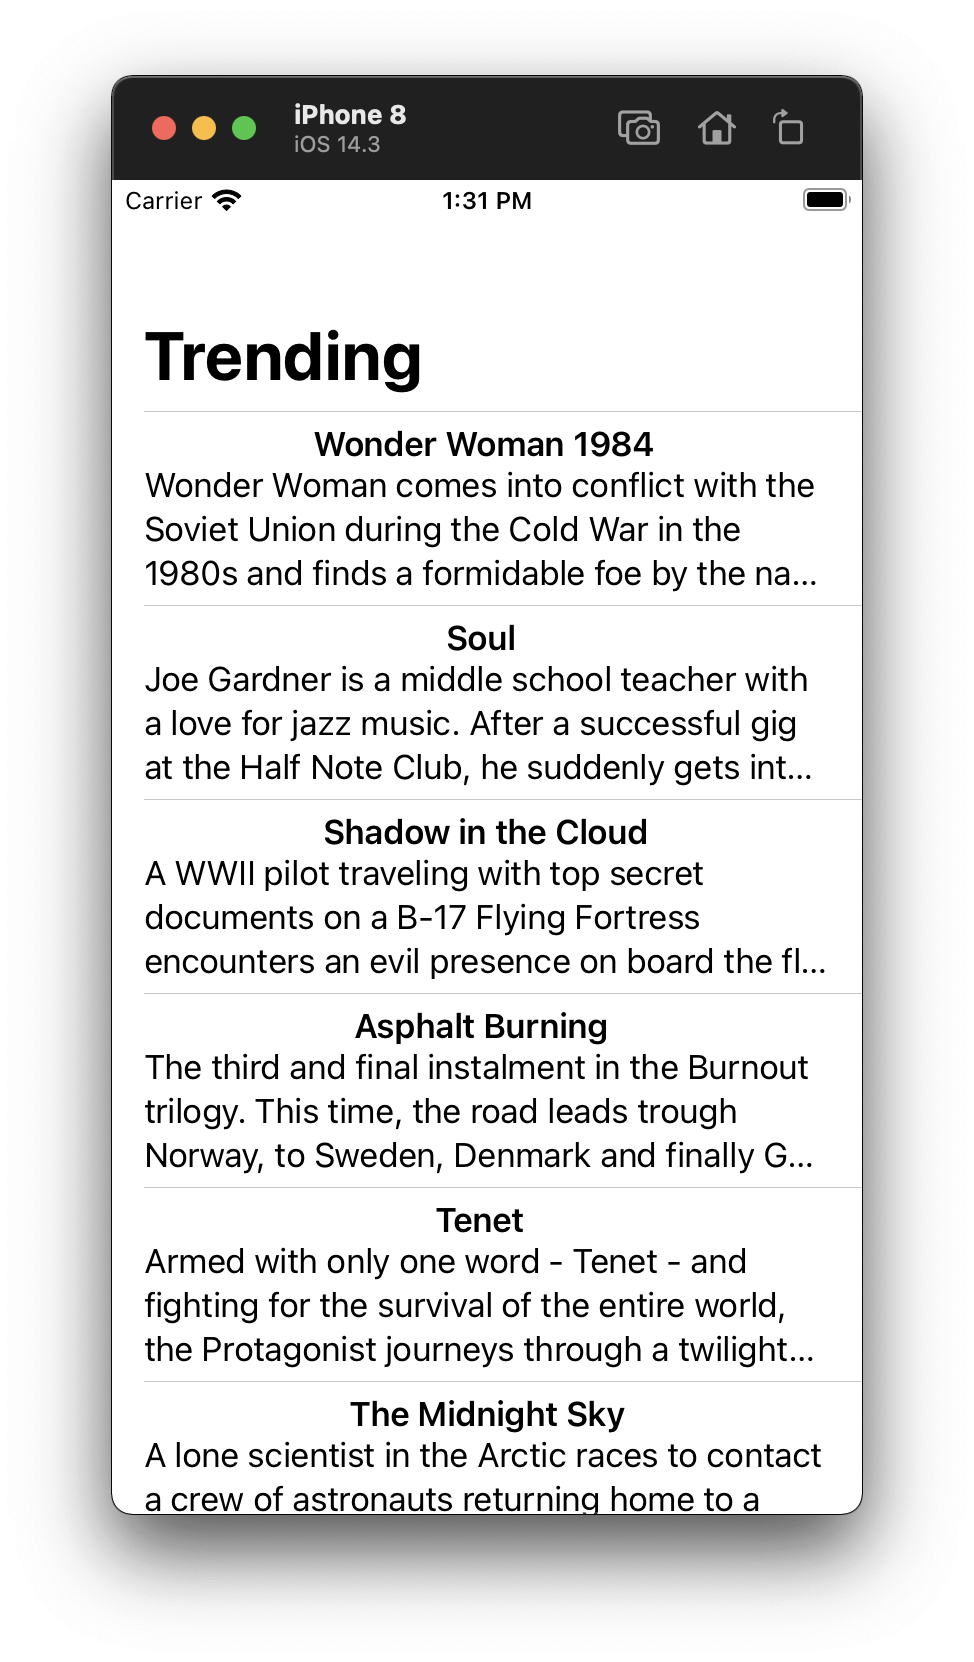
Ok, I can imagine that now you must feel like this is really dull. Just showing two movies side by side? Let's show an entire list. And while we're at it, let's have pagination and infinite scrolling... Ok, let's go! The TMDB API supports pagination for movies.trending. Let's try it out with that. Graphaello comes out of the box with a Pagination construct called Paging. Paging is an ObservableObject that provides you the features you need to use paging in your app. For now, we can use it to fetch trending:
struct Test: View {
    @GraphQL(TMDB.movies.trending)
    var trending: Use Paging to support PaginationPaging<MovieCell.Movie>

    var body: some View {
        NavigationView {
            List(Access the values directly using .valuestrending.values, id: \.title) { movie in
                MovieCell(movie: movie)
            }
            .navigationTitle("Trending")
        }
    }
}
Let's try and run it, to see what that looks like!
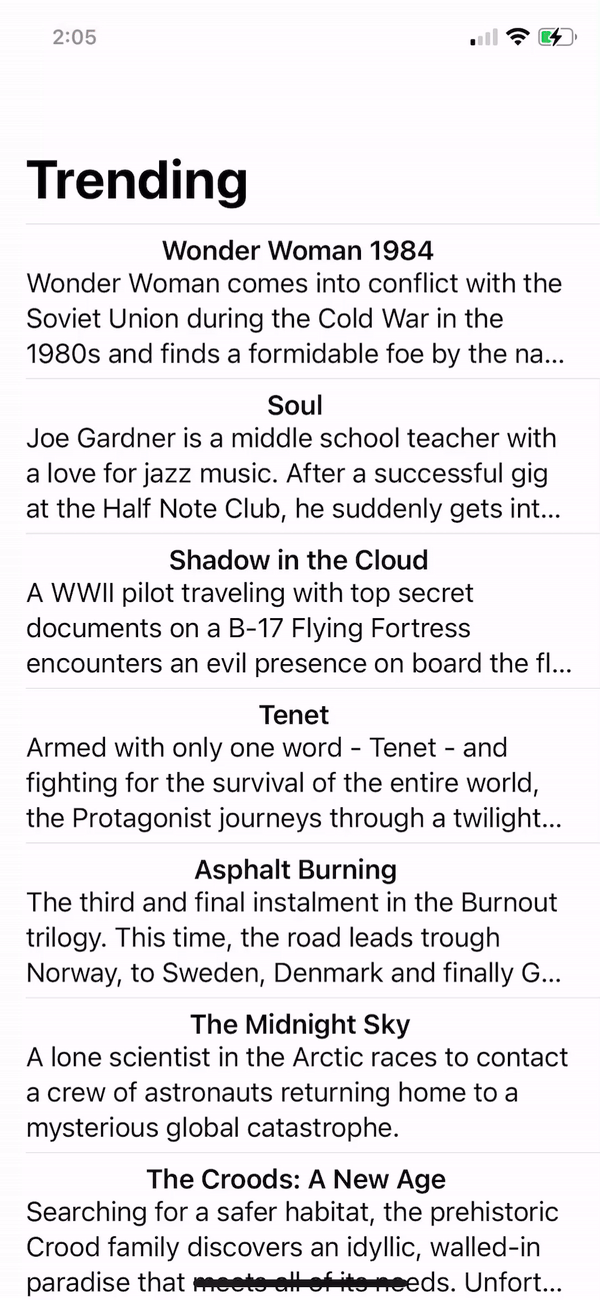
Right now, if we wanted to fetch the next page, we'd just call trending.loadMore(). But since the use case of infinite scrolling is very common: Graphaello also comes with a PagingView that implements that for us. So we're going to replace our List with a PagingView:
struct Test: View {
    @GraphQL(TMDB.movies.trending)
    var trending: Paging<MovieCell.Movie>

    var body: some View {
        NavigationView {
            PagingView implements infinite scrollingPagingView(trending) { movie in
                MovieCell(movie: movie)
            }
            .navigationTitle("Trending")
        }
    }
}
And done! We can now scroll through the trending movies forever.
Let's make it pretty!
Text is kinda boring. So the next step would be to load some images. For that, we will add a Kingfisher as a dependency, to be able to display images from the internet. So we'll go on File > Swift Packages > Add Package Dependency. There we can enter:
https://github.com/onevcat/Kingfisher.git
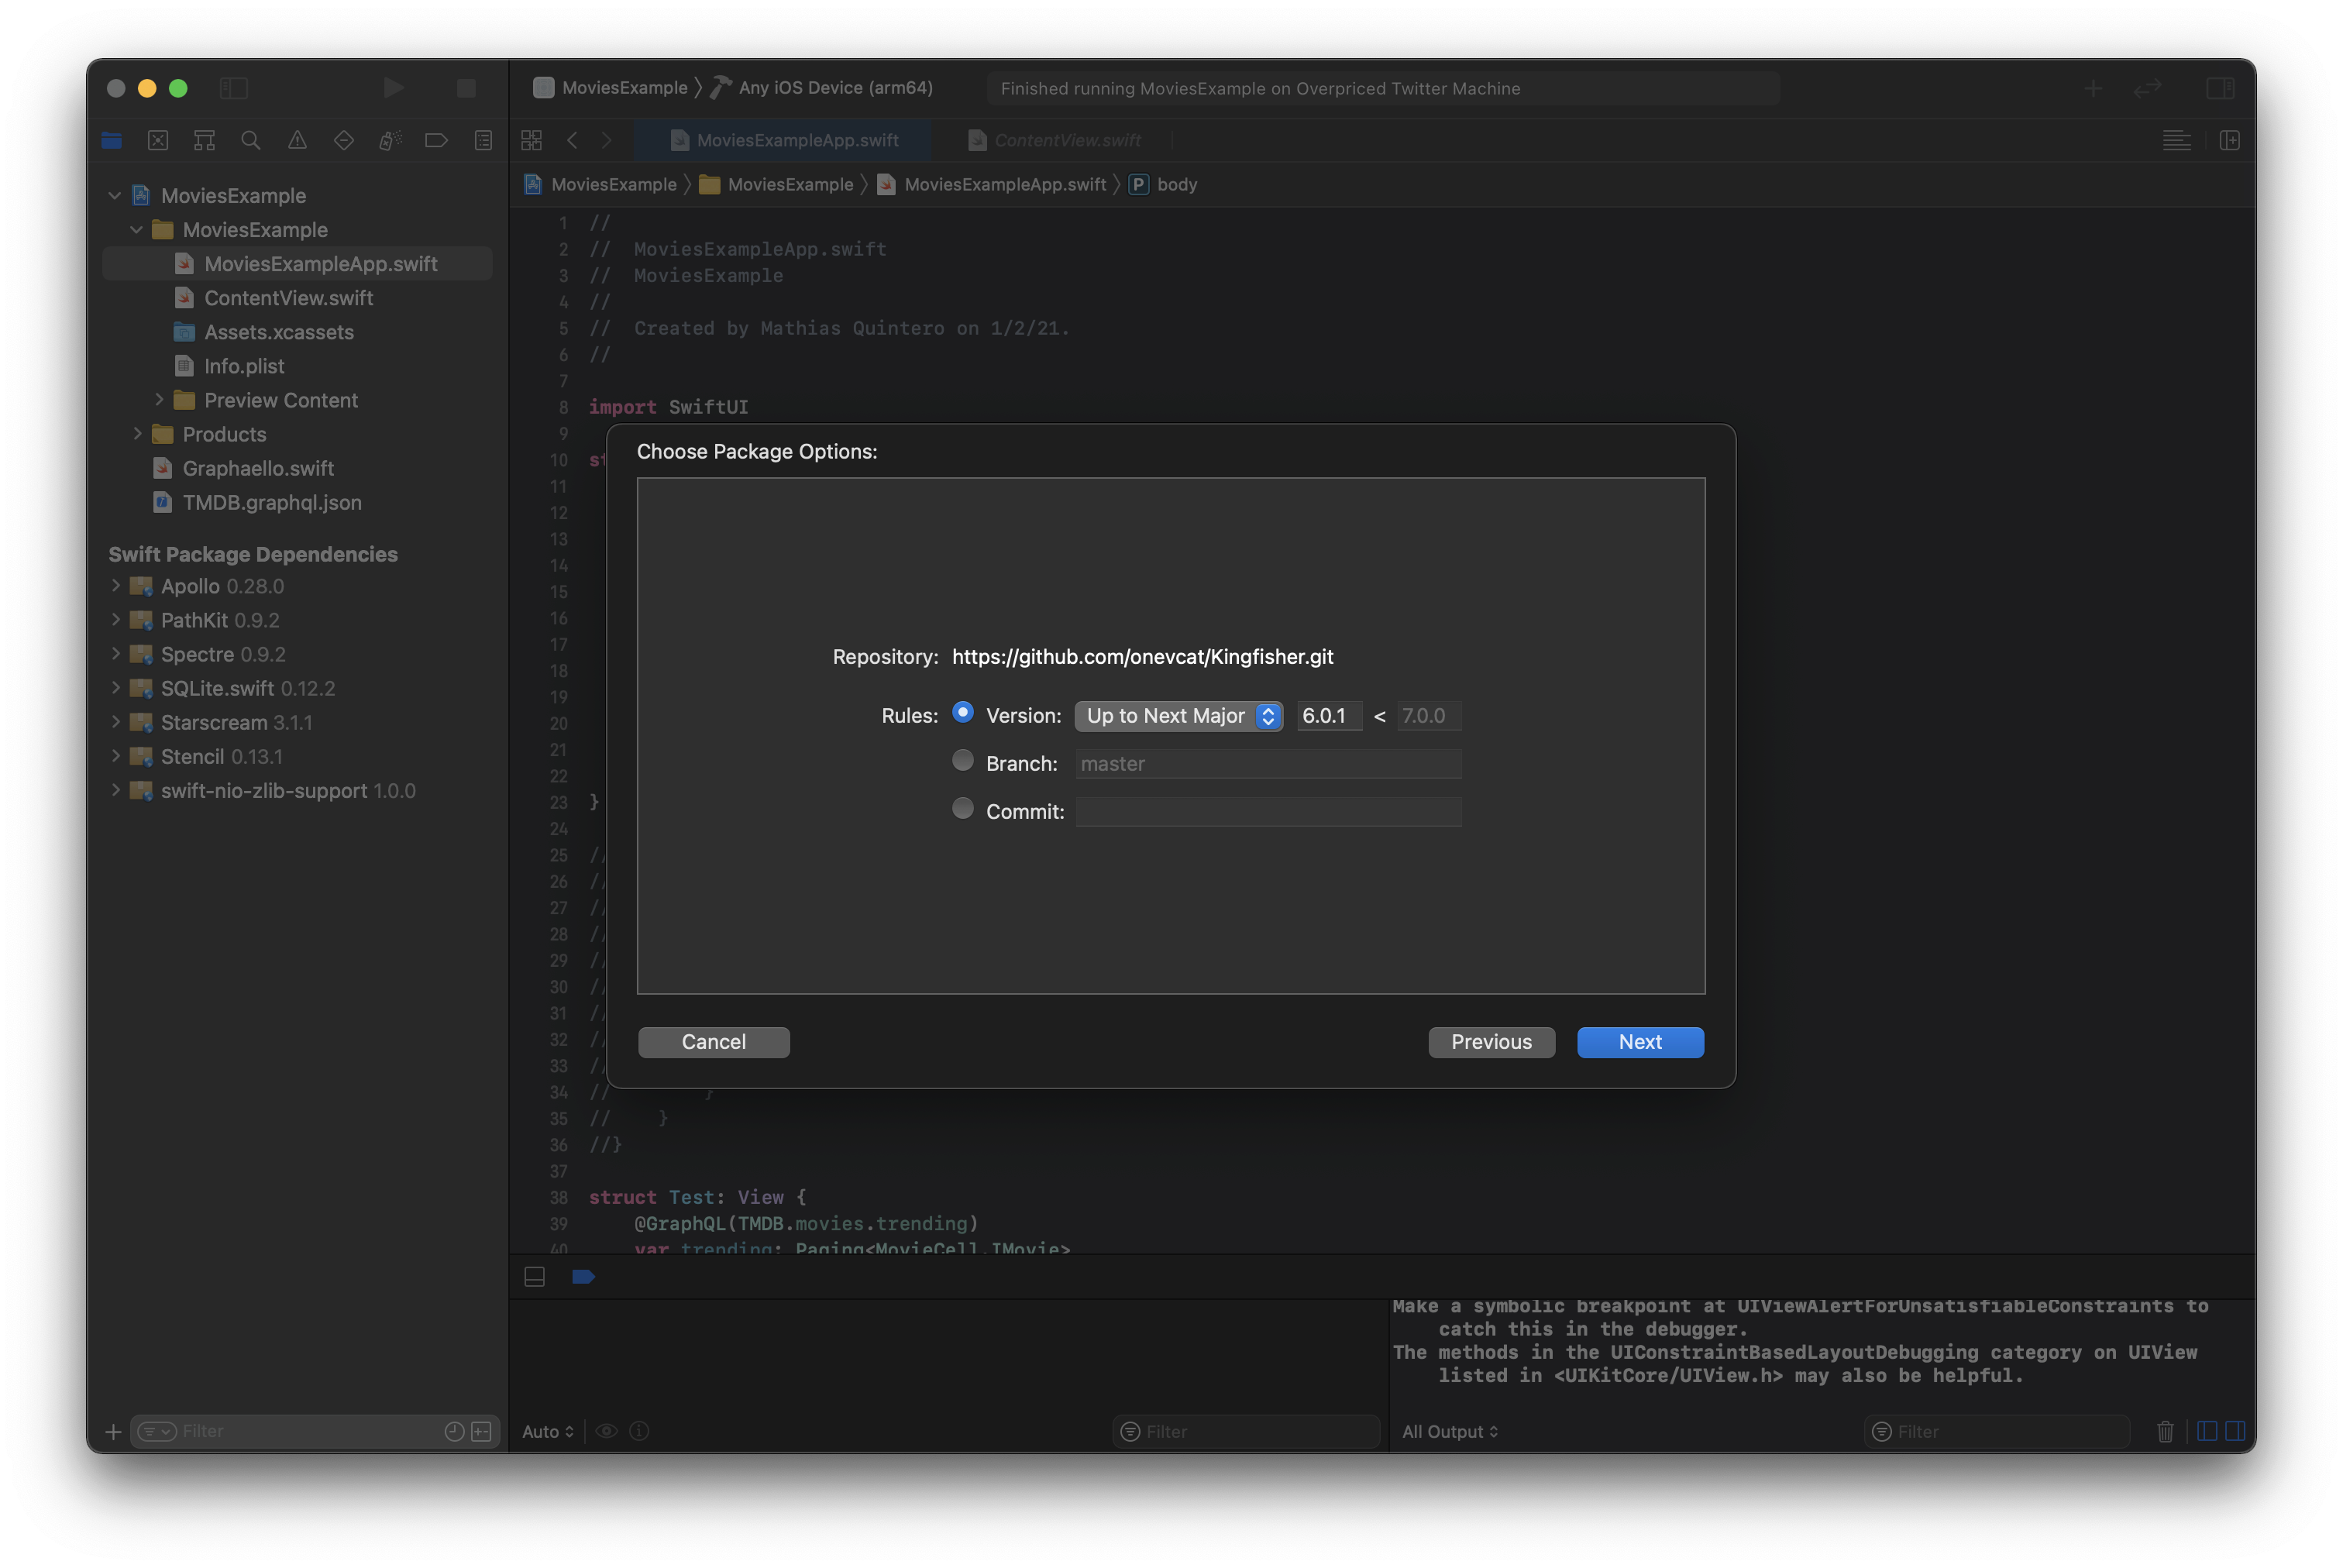
With Kingfisher added, let's try to display the poster for our Movie. In our MovieCell we'll query for the poster URL using poster. Then we can use KFImage to display the image from that URL:
struct MovieCell: View {
    @GraphQL(TMDB.Movie.title)
    var title: String

    @GraphQL(TMDB.Movie.poster(size: .value(.w154)))
    var poster: We specify that we expect to read a URLURL?

    var body: some View {
        VStack {
            if let poster = poster {
                Display the image in that URLKFImage(poster)
                    .resizable()
                    .clipped()
                    .aspectRatio(0.69, contentMode: .fill)
                    .frame(width: 100)
            }

            Text(title).bold()
        }
    }
}
Ready? Let's take a look at those images:
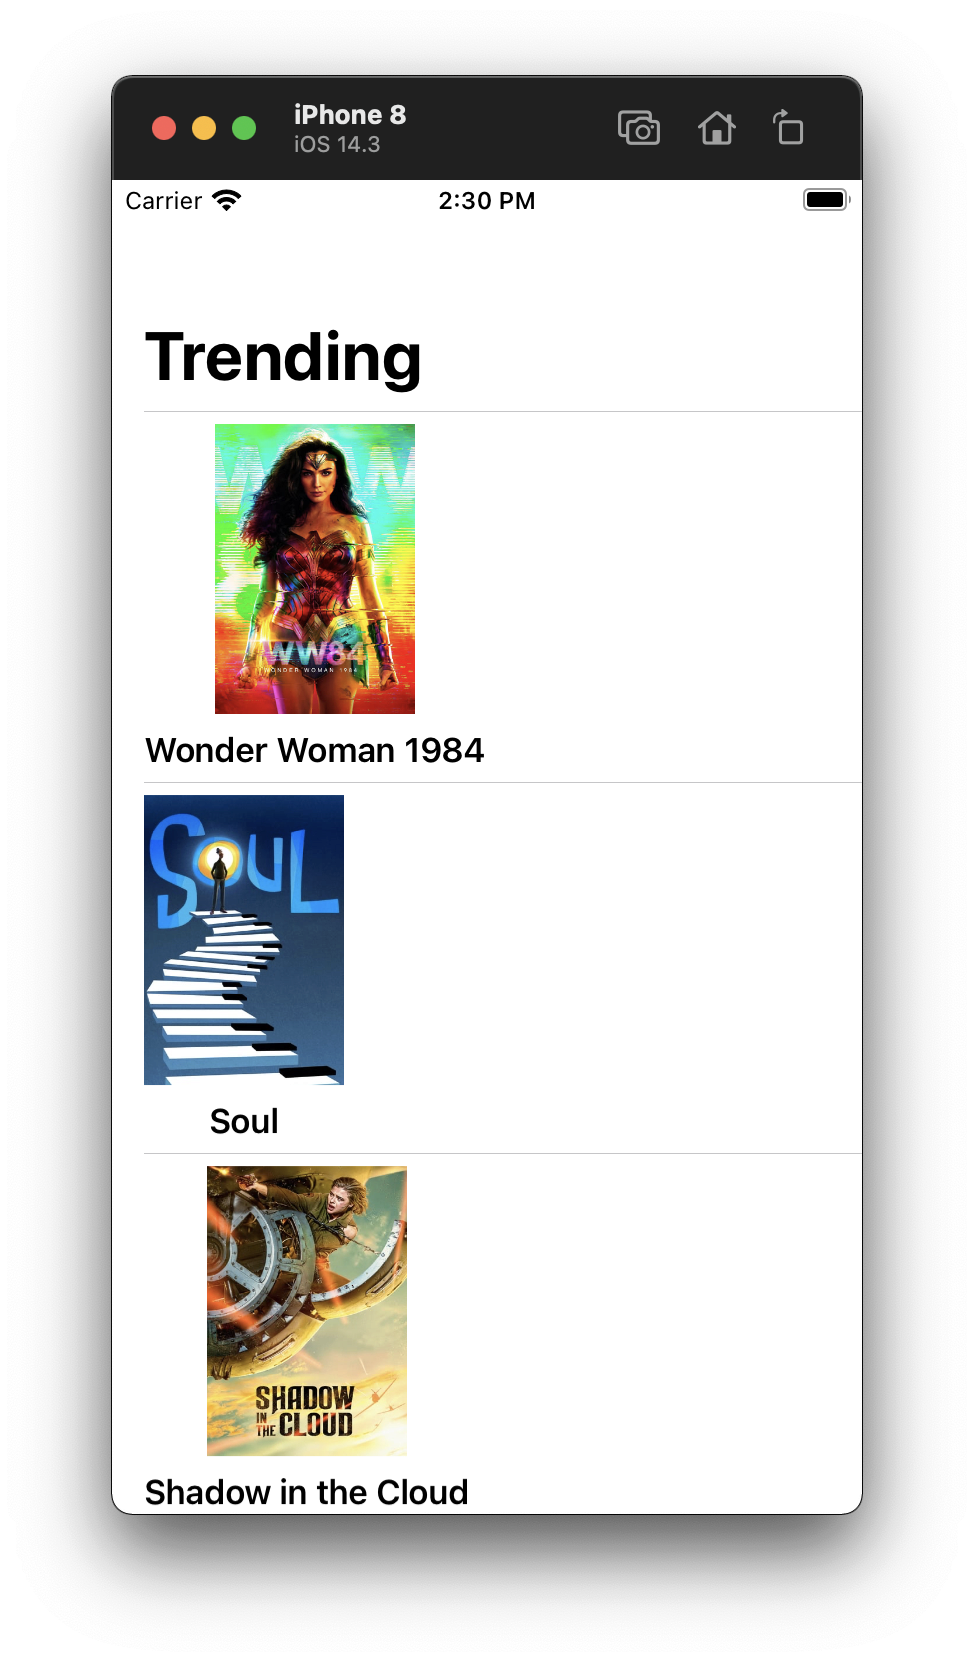
Cool! However, most movie apps use horizontally scrolling shelves to display movies. To remake that UI, we can tell the PagingView that we want to scroll horizontally.
struct Test: View {
    @GraphQL(TMDB.movies.trending)
    var trending: Paging<MovieCell.Movie>

    var body: some View {
        NavigationView {
            Wrap it in a ScrollViewScrollView {
                PagingView(
                    trending,
                    Set the mode to horizontalmode: .horizontal
                ) { movie in
                    MovieCell(movie: movie)
                }
            }
            .navigationTitle("Trending")
        }
    }
}
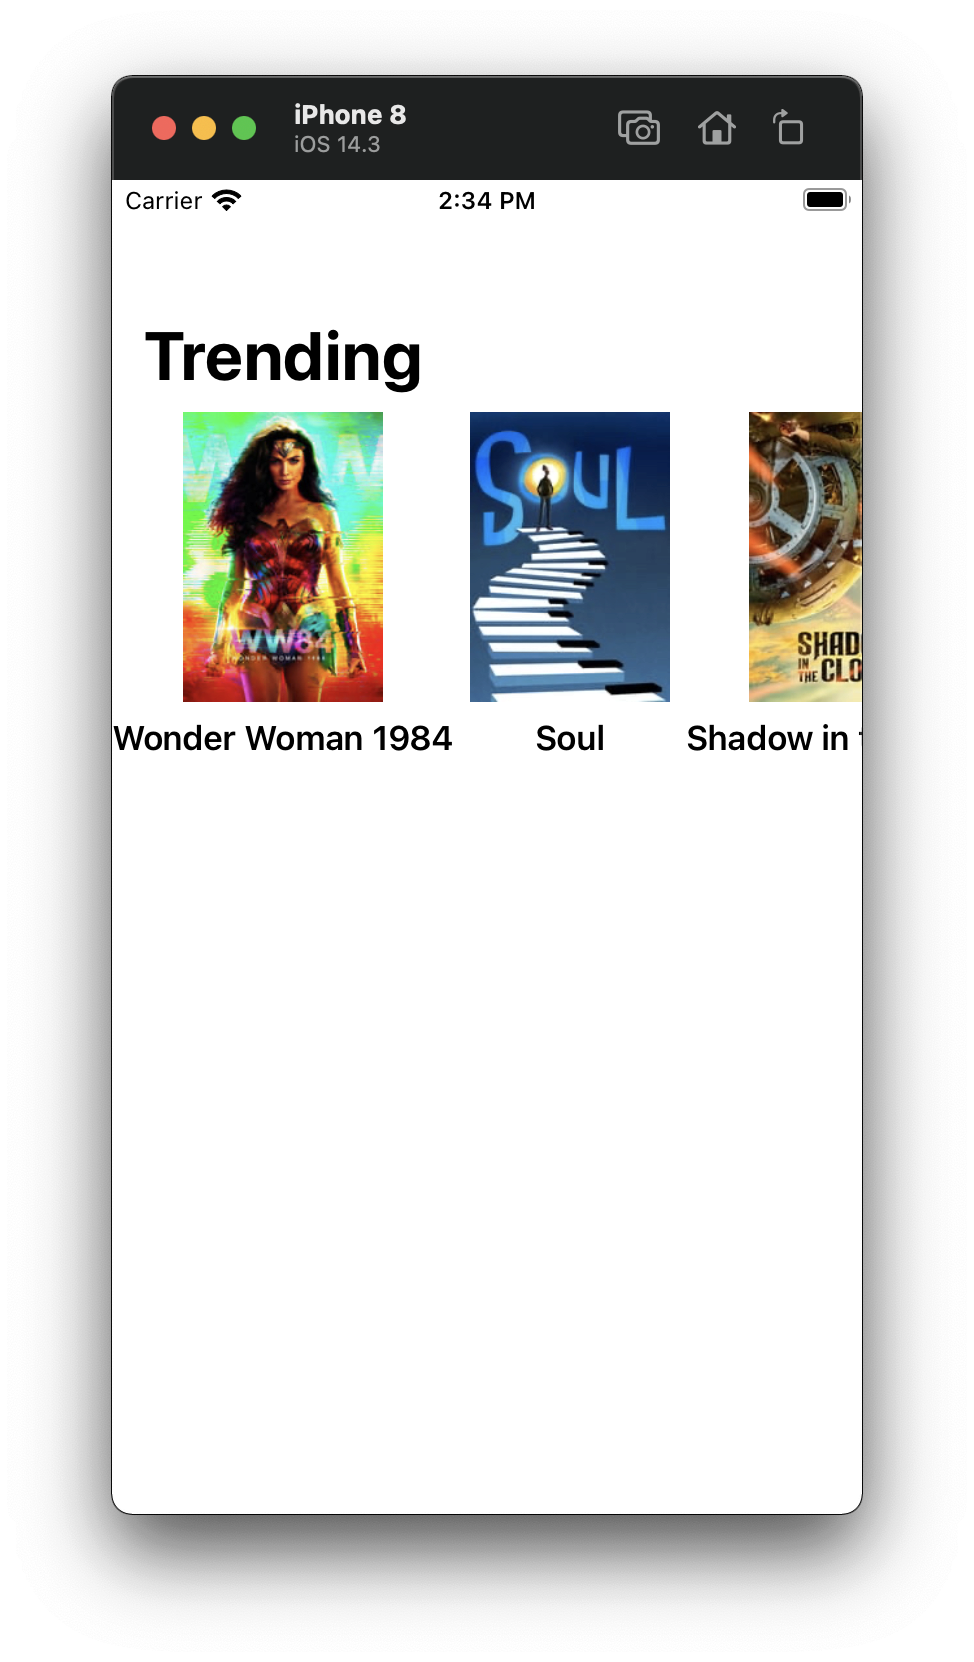
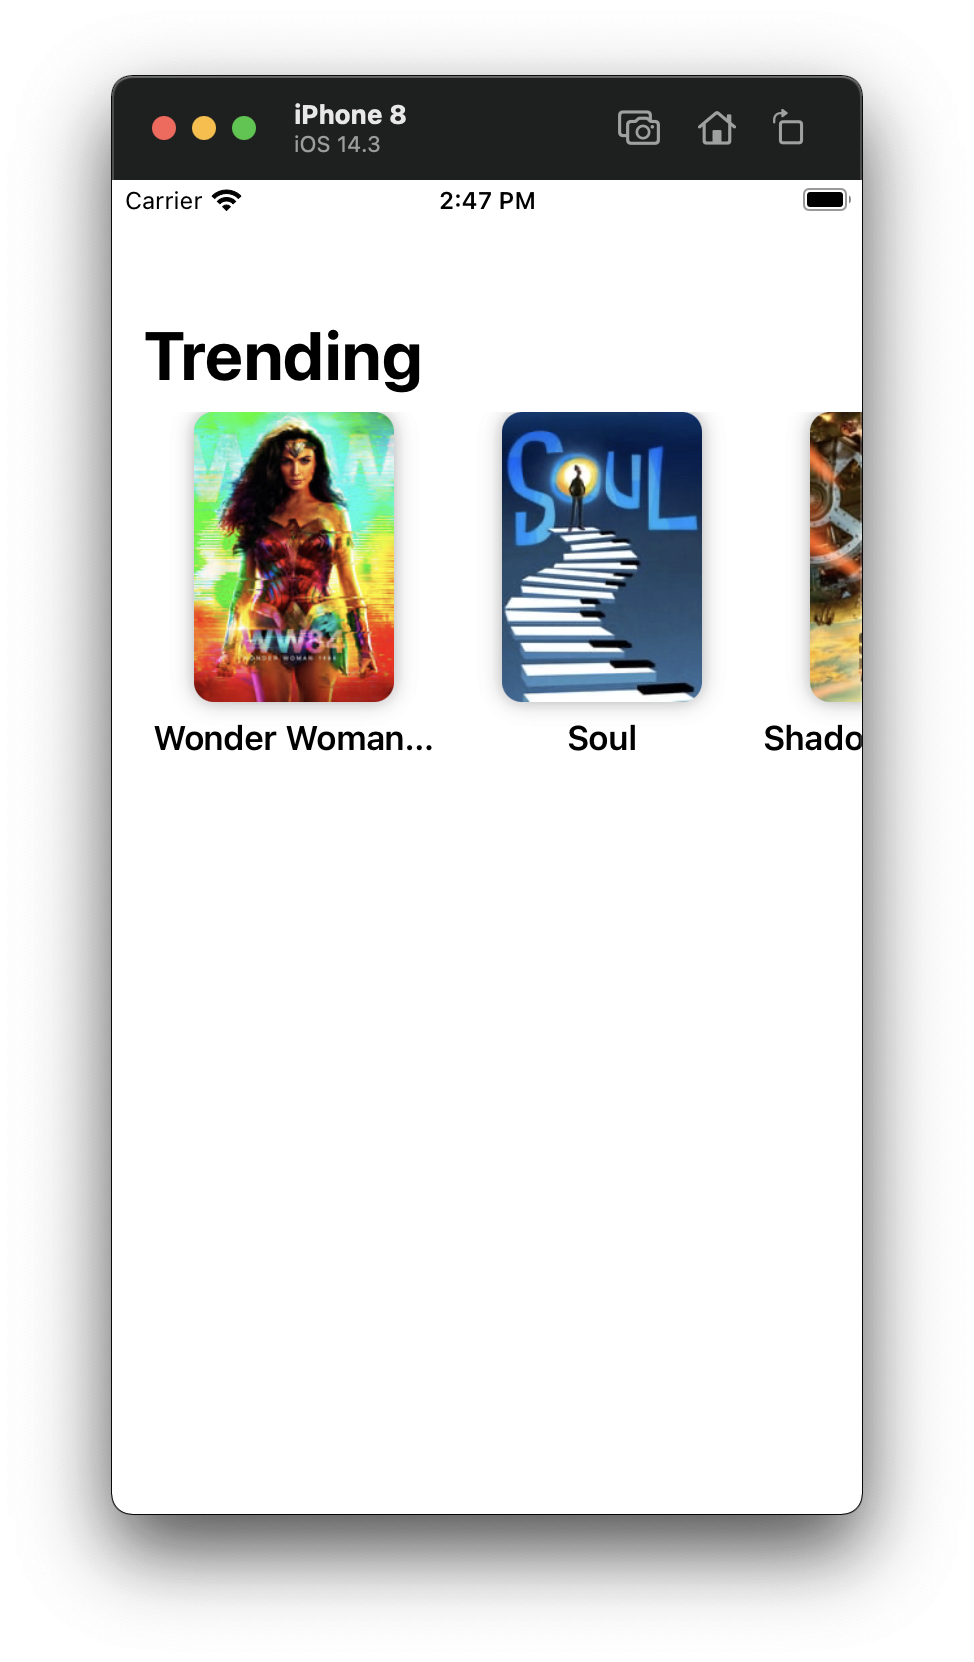
Ok. Looking good! Next up, I'd suggest a few UI improvements. This is the part when we get to have some good old-fashioned Paul Hudson style SwiftUI fun. First, in MovieCell let's add rounded corners to the image. Oh! And let's also cast a shadow. We also want all cells to look uniform, so let's set the width of the cell to a fixed value, and truncate the title to fix in only one line. This will lead to all the cells being aligned nicely next to each other.
struct MovieCell: View {
    @GraphQL(TMDB.Movie.title)
    var title: String

    @GraphQL(TMDB.Movie.poster(size: .value(.w154)))
    var poster: URL?

    var body: some View {
        VStack {
            if let poster = poster {
                KFImage(poster)
                    .resizable()
                    .clipped()
                    .aspectRatio(0.69, contentMode: .fill)
                    .frame(width: 100)
                    Add some rounded corners.cornerRadius(10)
                    Add a shadow.shadow(radius: 5)
            }

            Text(title).bold()Limit the number of lines.lineLimit(1)
        }
        Fix the size of the cell.frame(width: 150)
    }
}
As for our Test view, I'd suggest spacing the cells apart by a bit. And we should also add some padding to the content of the PagingView so that the first cell isn't directly touching the leading edge.
struct Test: View {
    @GraphQL(TMDB.movies.trending)
    var trending: Paging<MovieCell.Movie>

    var body: some View {
        NavigationView {
            ScrollView {
                PagingView(
                    trending,
                    mode: .horizontal(
                        spacing: 4,
                        Add some padding to the edges of the screenpadding: .horizontal,
                        by: 16
                    )
                ) { movie in
                    MovieCell(movie: movie)
                }
            }
            .navigationTitle("Trending")
        }
    }
}
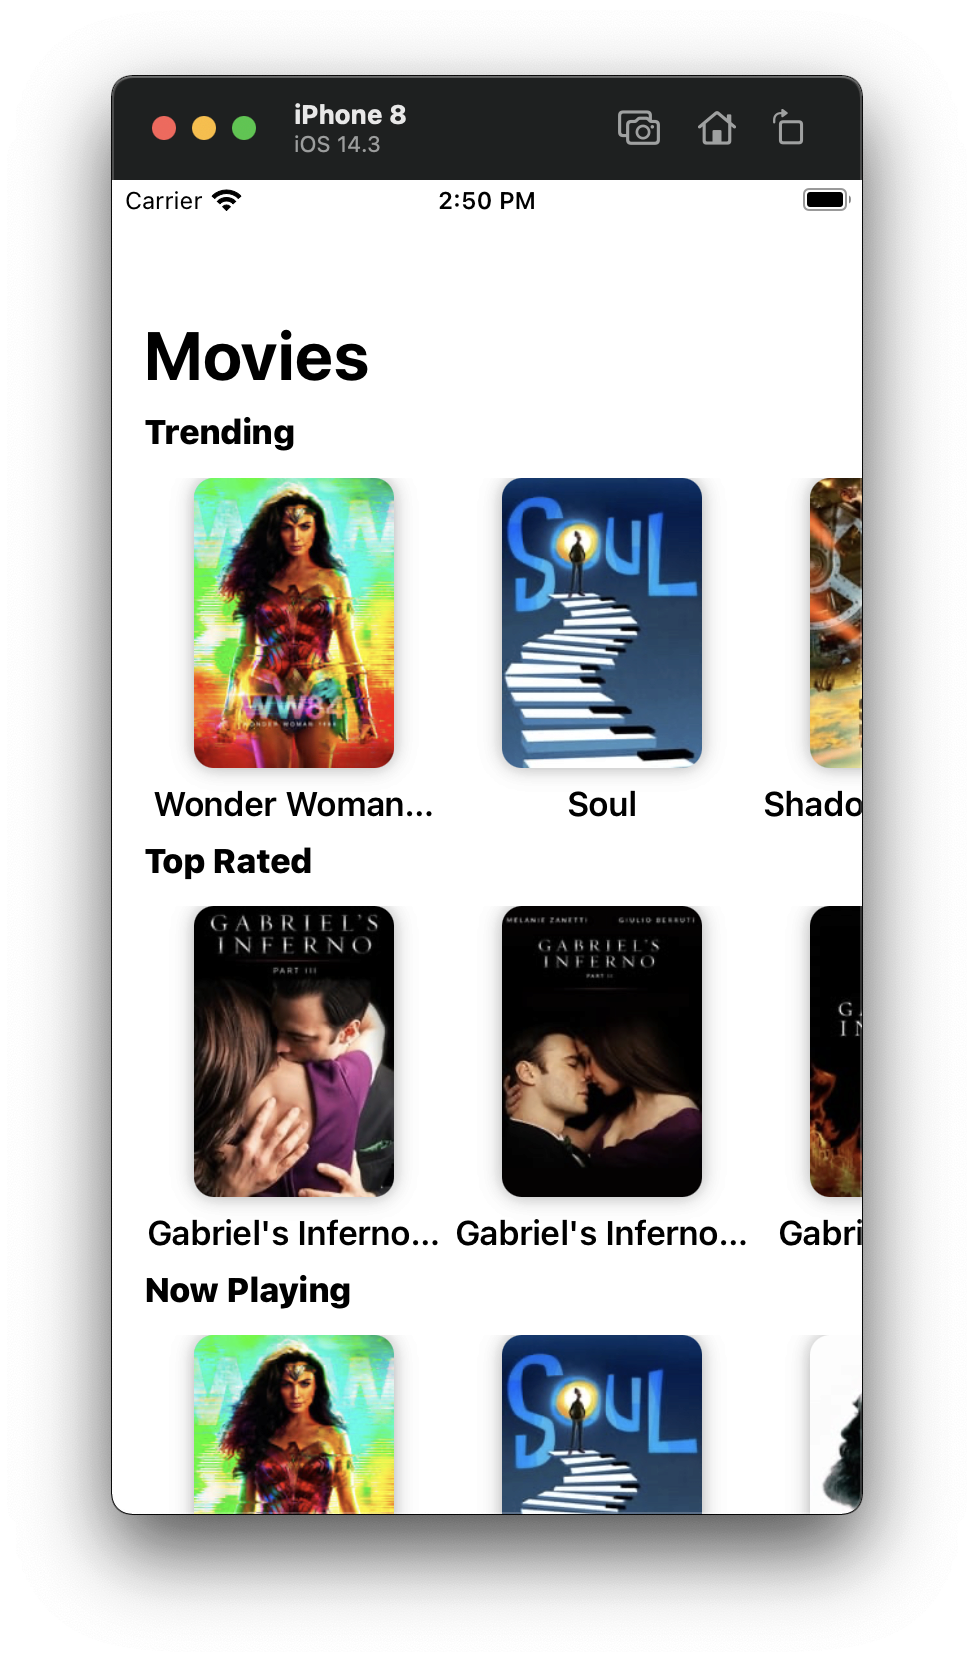
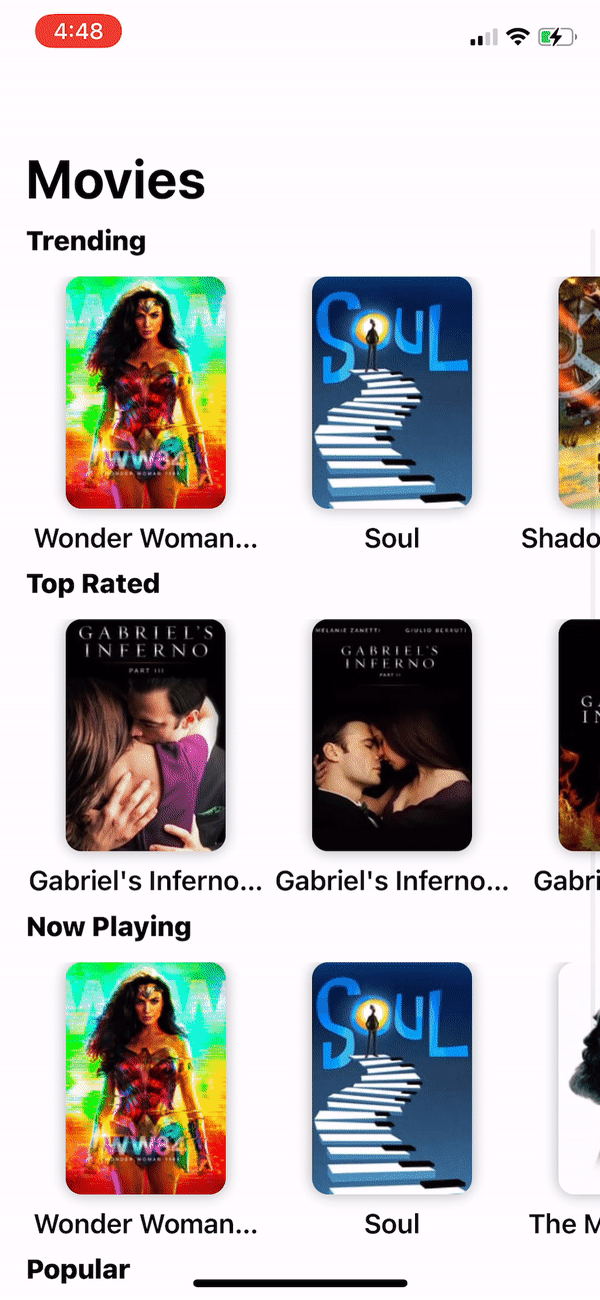
Finally, how about adding some more shelves to our App? Thankfully, this can be done with some simple copy and paste. We can add shelves for topRated, nowPlaying, and popular by copying the code for trending and adding some headlines to each shelf.
struct Test: View {
    @GraphQL(TMDB.movies.trending)
    var trending: Paging<MovieCell.Movie>

    @GraphQL(TMDB.movies.topRated)
    Load more moviesvar topRated: Paging<MovieCell.Movie>

    @GraphQL(TMDB.movies.nowPlaying)
    Load more moviesvar nowPlaying: Paging<MovieCell.Movie>

    @GraphQL(TMDB.movies.popular)
    Load more moviesvar popular: Paging<MovieCell.Movie>

    var body: some View {
        NavigationView {
            ScrollView {
                VStack(alignment: .leading) {
                    Add a new headlineText("Trending")
                        .font(.headline)
                        .fontWeight(.heavy)
                        .padding(.horizontal, 16)

                    PagingView(
                        trending,
                        mode: .horizontal(
                            spacing: 4,
                            padding: .horizontal,
                            by: 16
                        )
                    ) { movie in
                        MovieCell(movie: movie)
                    }

                    Repeat...
                }
            }
            .navigationTitle("Movies")
        }
    }
}
And then we can take a second to admire our pretty new app:
Note: I've noticed that this shelve UI can be laggy sometimes. I'm looking into it.
Conclusion
So there we are. Let's recap what we accomplished. We learned about the drawbacks that come with REST and how GraphQL can save us a lot of networking as well as pain during development. After that, we discussed how the declarative nature of GraphQL lends itself to creating beautiful data-driven UIs. The truth is that a declarative query language and a declarative UI framework is a match made in heaven. And we took a deep dive into Graphaello and learned how to use GraphQL from SwiftUI without exiting Xcode (or writing any GraphQL, really). We experimented with reusing views and pagination. And saw an approach to structuring a SwiftUI App that uses a GraphQL API.

I really hope you enjoyed this tutorial and that you'll consider using GraphQL (and maybe even Graphaello) for more apps in the future. If you have any questions about GraphQL, SwiftUI, or Graphaello, please contact me either via GitHub issues or Twitter.
Further Reading
Here's some useful links you might want to take a look at to explore this topic more:
Graphaello: If you like it, I'd really appreciate a star ⭐️
GraphQL: Read up more on GraphQL
Relay: Relay JS framework which inspired this workflow
Paul Hudson's articles on SwiftUI: Great resource for getting started with SwiftUI
TMDB GraphQL Wrapper: Source Code of the example API we used for this article